eBook Formatting
There’s more than one way to skin this cat., so today I’m sharing three strategies for formatting your ebook file. This part of the self-publishing process can be overwhelming because there are multiple directions you can go. But if you look at your layout requirements and decide how simple or complex your want them to be before you get started, you’ll be able to make the best ebook formatting decision for your book.
The first decision you need to make is whether your book is going to have images or just text. Text is the simplest option and that’s an easy call for fiction books, but when you write nonfiction these usually includes a few images or diagrams to illustrate your text. And if you’re writing a travel guide, or other travel book, it’s an obvious choice to include stunning images of your destinations. But you need to offset that desire for images, against the complexity it adds to your ebook file formatting.
Flowable formatting is the easiest way to format your book, and gives your readers the control of how the text and images are displayed, but if you don’t want your readers to be able to adjust the fonts or text layout, or want your images in specific positions within your text, you’ll need to master fixed formatting.
How Simple do you want to make your life?
You book formatting process can be as simple or as complex as you want it to be. The parameters to consider are whether you want a flowable or fixed format layout, and if you want to include images.
- Simple Option: No internal images, and flowable format.
- Intermediate Option: Some images, and flowable format.
- Advanced Option: Images, call-out boxes, tables, with flowable format using HTML, or fixed format.
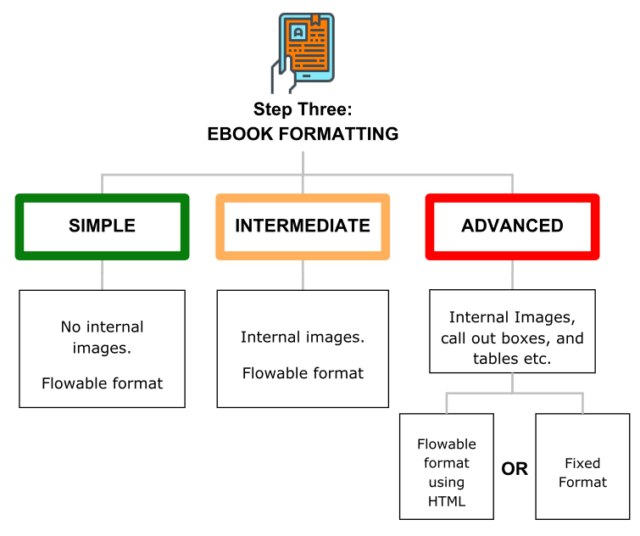
3 options for formatting your ebook
Travel guides scream out for images, but when you distribute via Amazon they will charge you a file delivery cost for every book you sell, and this is based on your book’s file size. The more images you include the bigger your file size, and the higher delivery fee Amazon will charge you each time a reader purchases and downloads your book. The good news is that none of the other retailers charges for file size.
Understanding Your Amazon File Size Impact And Options
When you list your book between the sweet spot of $2.99 to $9.99 you have the option of choosing between a 35% and a 70% royalty. Outside of that range you will only have the option of choosing the 35% royalty. The other caveat is that you can’t select 70% for sales to customers in Japan, India, Brazil and Mexico, unless you enroll in the KDP Select Program.
On the surface, the logical selection is to choose the higher royalty fee, but then Amazon will charge you a per megabyte delivery fee, and they round file sizes up to the nearest kilobyte.
Here’s a summary of the delivery costs in all the Amazon markets.
- Amazon.com: USD $0.15/MB
- Amazon.ca: C$0.15/MB
- Amazon.com.br: R$0.30/MB
- Amazon.co.uk: UK £0.10/MB
- Amazon.de: €0,12/MB
- Amazon.fr: €0,12/MB
- Amazon.es: €0,12/MB
- Amazon.it €0,12/MB
- Amazon.nl: €0.12/MB
- Amazon.in: INR ₹7/MB
- Amazon.co.jp: ¥1/MB
- Amazon.com.mx: MXN $1/MB, and
- Amazon.com.au: AUD $0.15/MB
If your book ends up being a large file, these delivery charges will eat into your royalty fee. There’s a royalty break-even point where it would make sense to opt for the 35% royalty fee based on the file size and list price, so you can avoid the delivery charge and receive higher royalties by choosing the lower royalty rate.
I found this break-even point with my first book:
- I included lots of images throughout my first travel guide to create a 20MB file size, which resulted in a $3 delivery fee (20 x $0.15 = $3).
- When I selected the 70% royalty rate on a $5.99 list price, the royalty calculated to $2.09, after the delivery fee.
- When I selected the 35% royalty rate, the royalty calculated to $2.09, and there was no charge for delivery.
So based on my $5.99 list price and 20MB file size, I would have received the same royalty amount, no matter which percentage royalty rate I chose. By reducing my file size just a little it made the 70% royalty rate the best option.
Rather than settling for this low return on my writing investment, I wanted to get my delivery charges below a dollar per book.
- I removed images from my source file and ended up with a 5.25MB file size and a $0.79 delivery fee (5.25 x $0.15).
- When I selected the 70% royalty rate on a $5.99 list price, the royalty calculated to $3.64.
Note: For the 70% calculation Amazon takes your list price and deducts the delivery charge, and then calculates 70% of this adjusted net amount. So in my example I’m actually getting 70% of $5.20. ($5.99 list price – $0.79 delivery fee = $5.20).
To make up for the removal of images in my book, I added links to the destination Image Galleries on my website using trackable links, which resulted in a double-win. It reduced my delivery costs and these links drive traffic to my website.
Let’s look at three different ebook formatting approaches, from simple to advanced to help you decide which path is best for you and your nonfiction book.

Simple: Ebook Formatting
- No internal images
- Flowable format
This simple approach means you’ll only have to master the art of formatting text headings and chapter breaks, and your primary focus will be on content structure. Your familiarity with any word processing program means there won’t be a steep learning curve to create your source files.
You won’t have to familiarize yourself with pixels per inch or image compression techniques. But you should know (or learn) how to add hyperlinks in your source document to direct your readers to your website’s image galleries or your Pinterest boards.
Here’s an article about creating your flowable ebook file for Amazon KDP

Intermediate: Ebook Formatting
- Some images
- Flowable format
You can use a flowable format even if you include images, you just won’t have as much control over how the images are displayed on the page unless you format your book using HTML. In flowable format, the standard image positioning is between the paragraphs, and this will result in a more consistent display of your images across a broader range of ereaders.
In flowable format you can design your book with smaller text-wrapped images in your source file, but your image position could move based on the e-reader it’s being displayed on, and this can result in ugly text positioning. So if you want your book to look consistently good across many generations of ereaders, position your inline image between paragraphs.
The quality of your digital file depends on the format, accuracy and complexity of your source file. As long as you’re willing to format your source document systematically, you can use the retailer’s/aggregator’s automated conversion processes to seamlessly create your EPUB file.
NOTE: You don’t just have to stick with including single inline images, you could also create full page size image grids. Here’s an article I wrote about this approach:

Advanced: Ebook Formatting
- Flowable format using HTML, or fixed format
- Images in fixed locations, call-out boxes, and tables
If you want to create a fancy-looking travel guide, which includes complex content features, strategically positioned images, and call-out boxes (where text is placed over a colored background) you have two options.
Travel guides, like recipe books, are obvious candidates for complex layouts, but whereas recipe books are static, your travel guide content will be more fluid, requiring more updates to keep it current. So bear this in mind when you’re formatting your complex layout.
Flowable Formatting using HTML
Traditionally published ebook travel guides use flowable formatting. At first glance it may appear publishers are using a fixed-layout, but those complex-looking initial pages are actually single images.
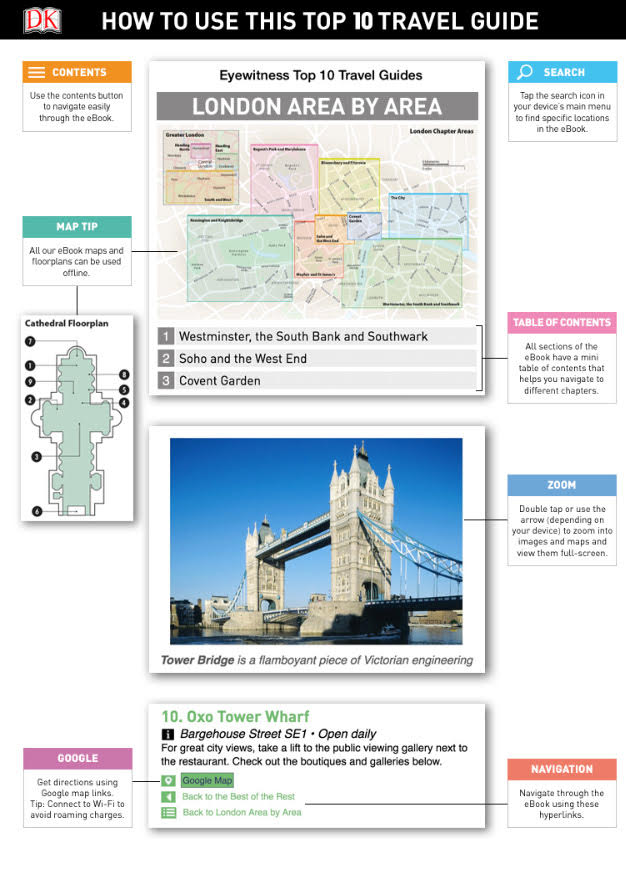
Complex single image inserted into a travel guide
The main body of their content is flowable format created using HTML to create call-out boxes. But they use inline images between paragraphs so their content displays consistently across any ereader.
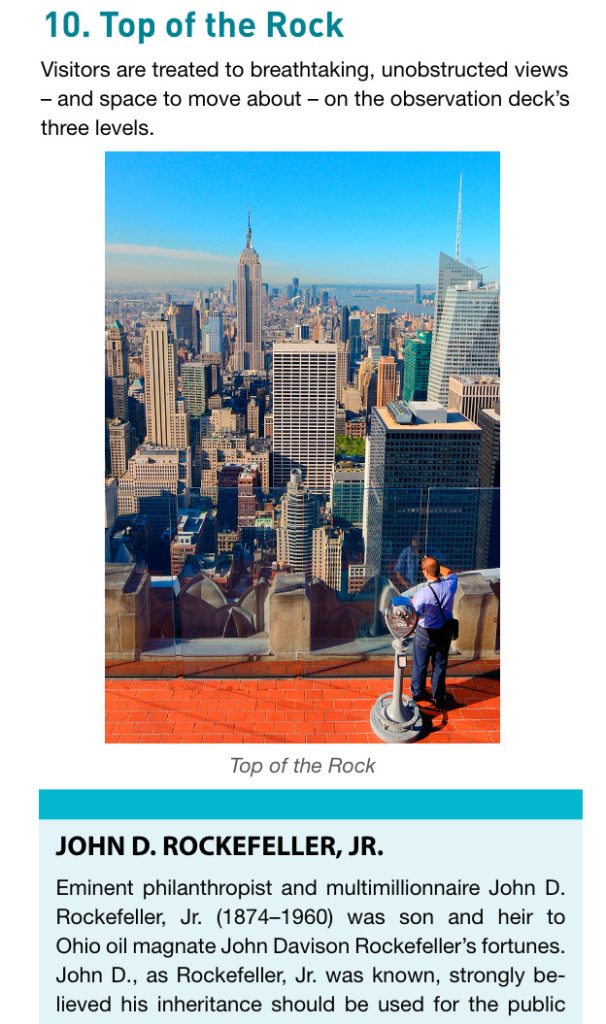
Inline images in an ebook
Here’s an example of the ereader setting instructions DK Guides includes in their flowable format ebooks so the reader gets to experience the content the way they intended. If a reader ignores these instructions, the content will be displayed based on the current ereader settings.
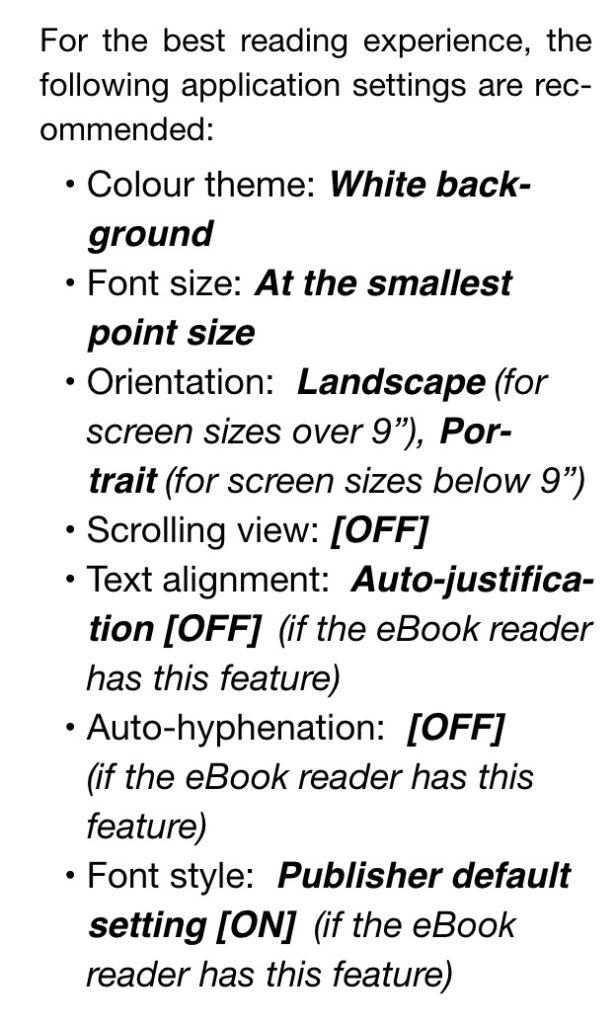
DK Guides ereader settings
You need a good understanding of HTML to ensure your text and images display correctly, and when they don’t, you need a good enough understanding of code to be able to troubleshoot the solution. If this screen shot scares you, then stand well clear of HTML.
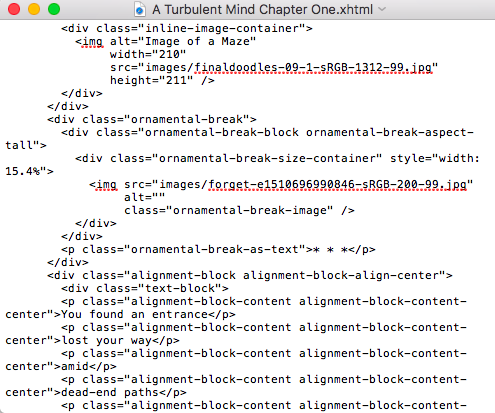
HTML snapshot of an ebook
The most widely used layout and design elements featured in travel guides can be achieved using HTML to create a flowable format file.
Fixed Formatting
When you go down the path of creating a fixed format ebook, the software features create a fully interactive travel guide, which includes audio and video files. This is obviously incredibly appealing for travel guide writers, but it’s early days for these features, and you’re reducing your potential reader pool.
If you’re adamant about wanting a fixed format version of your ebook, it’s advisable to create a flowable format version as well so it’s readable across all generations of ereader. Just make sure your cover and book description clearly indicate the difference between the two versions.
So what’s your best path?
If you’re just starting out and feeling a little anxious or overwhelmed, opt for minimal images and flowable formatting. This is one of the simplest approaches you can take, but still delivers some visual delights for your readers. This is especially useful when you’re publishing a text-heavy nonfiction book, that could benefit from a few images or illustrations to break up the big blocks of text, or include visual signposts to help readers navigate your book more effectively.
In this blog post I’ve used a basic illustration to introduce my simple, intermediate, and advanced sections, and I use those same illustrations throughout Book 3 of my How to Write and Self-Publishing a Travel Guide (Publish Your Book) – to help readers choose the best publishing path for them, based on their skill level and budget.
As an author you want to give your readers a good reading experience, but if your complex formatting decisions are holding you up from publishing your book—simplify your life, and opt for simple ebook formatting.
[bctt tweet=”What ebook formatting decisions do you need to make to get your book published? Will you include images? Are you using fixed or flowable formatting? Get help here…” username=”BirdsOAFpress”]
[travelguide]